Tutorials
Your story begins in the cloud
Let's start with the obvious - your output files produced by Telestream Cloud need to be delivered somewhere. Media that you process with Timed Text Speech or Quality Control services eventually will end up in one of the stores you set up to use with Telestream Cloud.
If you haven’t used any cloud storage so far you need to start from the ground up by choosing one of multiple storage providers supported by Telestream Cloud. Whatever provider you choose, we always make sure your content is processed as close to your store as possible to avoid egress cost whenever possible.
The choice is yours!
Depending on your needs, location or infrastructure you’re already using you need to pick one of storage options available in Telestream Cloud:
- Amazon S3 (Simple Storage Service) - see tutorial
- Google Cloud Storage (GCS) - see tutorial
- Azure Blob Storage - see tutorial
- Aspera Enterprise
- FTP server
Another step forward
Do you already have your storage in the cloud? That's great! The next step is adding it in the user console of your Telestream Cloud account.
All of stores management is accessible from global setting menu in the upper right corner of the Telestream Cloud console. You need to pick “Manage Stores” from the drop-down list.
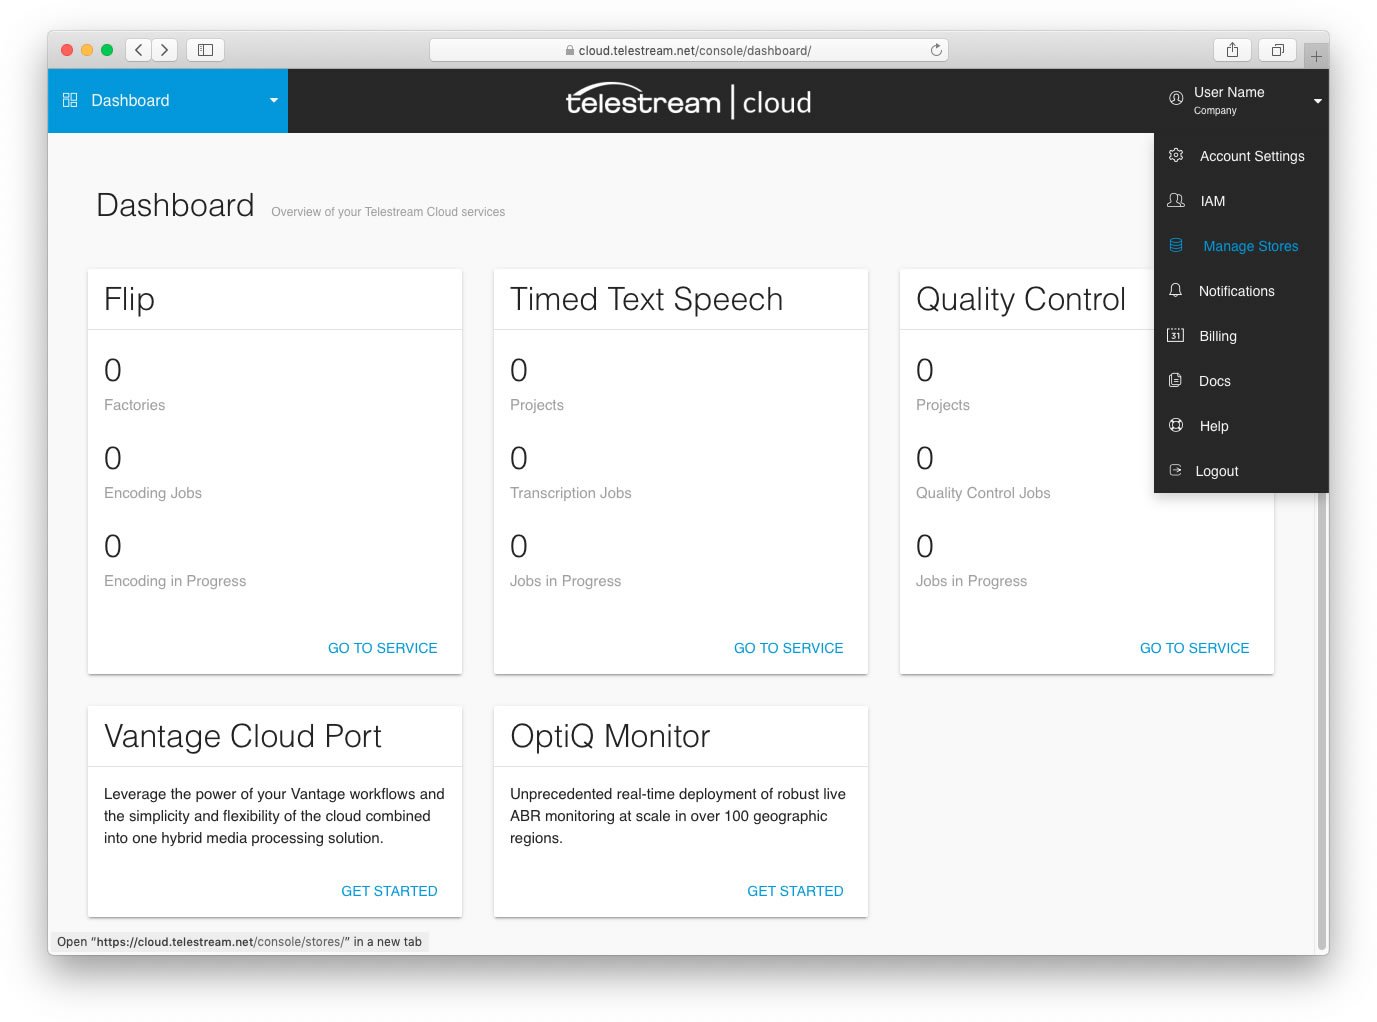
This is where you can see list of your stores, add new ones, remove or edit existing ones. In the following parts of our documentation, we describe how to step by step create your own storage with a selected cloud storage service provider, how to configure and add it in the Telestream Cloud console to be able to fully use the potential of our services.
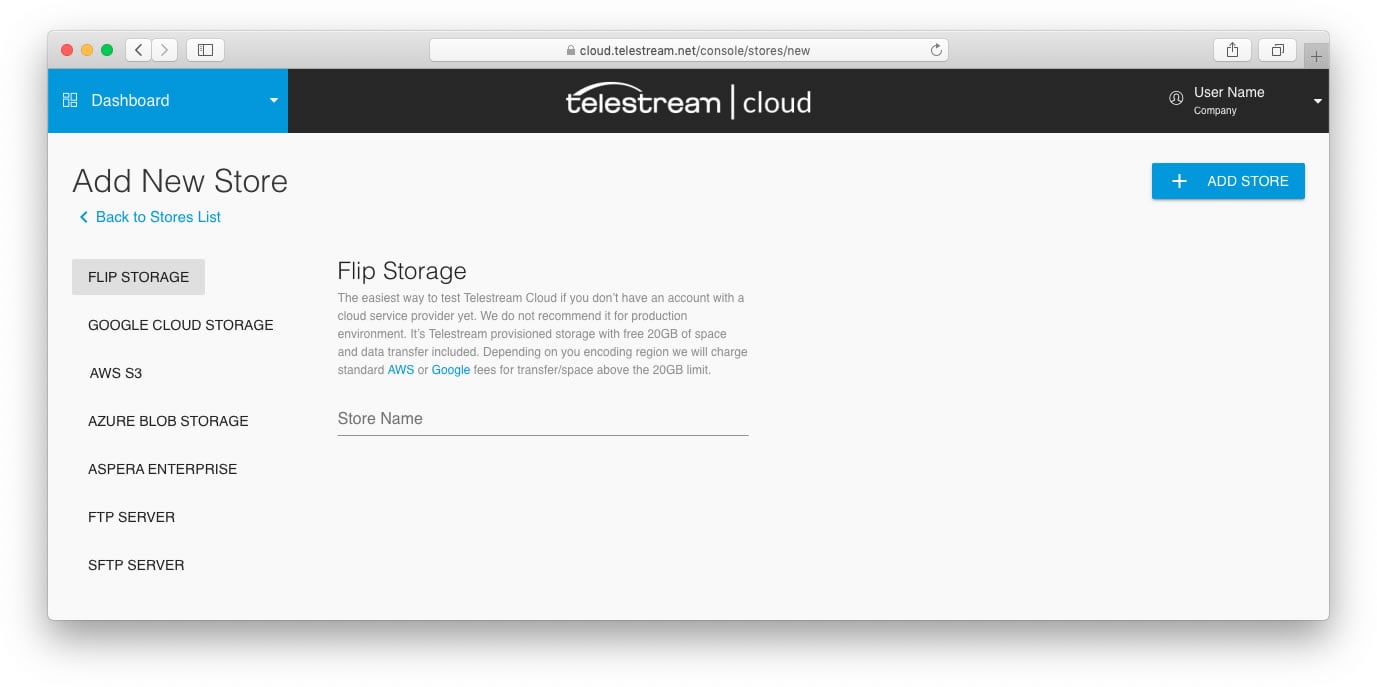
To get started simply click on the Add store button and here we go...
Start with creating Amazon Web Services account
If you have decided to use Amazon S3 as your storage for Telestream Cloud services, you should first create an account with Amazon Web Services if you don’t have one already. Go to https://portal.aws.amazon.com/billing/signup#/start and fill in the registration form.
Once you’re logged in to the AWS Management Console go to https://aws.amazon.com/s3/ and choose Get started with Amazon S3 and follow the on-screen instructions. You will be notified via email when your account is active and available for you to use it. Don’t worry, you will not be charged for Amazon S3 until you actually start using it.
Creating bucket manually in AWS Management Console
Amazon S3 as most of the cloud storage services store your data, your files in general, as objects within buckets that are like folders. You can create the bucket by yourself in your S3 console. How to do it?
Follow the instructions, step by step:
- Open the Amazon S3 console at https://console.aws.amazon.com/s3/
- Click the button Create bucket
- Choose the name of your bucket in the Bucket name field. Remember that it must be DNS-compliant. Follow the naming guidelines:
- The name must be unique across all existing bucket names in Amazon S3.
- You cannot change the name after the bucket is created.
- Choose a bucket name that reflects the objects stored in the bucket.
- Remember that the bucket name is visible in the URL that points to the objects that you're going to put in your bucket.
- Choose your region, for example US West (Oregon). Remember that if you create bucket in a region where we’re unable to process your media
- Click the button Create.
Now your bucket in Amazon S3 is ready to use but first we need you to grant us access to it so we’re able to deliver files to it. Depending on how you define permissions in S3 you might be able to create buckets directly from our console when adding a store instead of manually in AWS, simply entering a name in an appropriate field.
When adding a store, you can pick one of two ways to grant access to a bucket - using either Role ARN or with Access Key and Secret Key pair.
Providing access to AWS bucket with ARN (Amazon Resource Name)
If you’re already familiar with AWS roles and use them on regular basis you may prefer using this method. In this case, we only need you to provide us with the Role ARN you wish to use with Telestream Cloud. This role can be later reused by you to grant us access to any AWS resources you would use with our services (e.g. to grant access to other S3 bucket or to set up notifications).
IAM Role is an AWS identity not associated with one user but assumable by anyone permitted and has defined policies that determine what it can and cannot do in AWS.
A Role ARN (Amazon Resource Name) can be found in AWS Management Console under Services > Security, Identity & Compliance > IAM > Roles in the navigation panel.
To create a Role from scratch login to your AWS console and go to Services > Security, Identity & Compliance > IAM > Roles and click Create Role.
In Create Role wizard select Another AWS account as a type of trusted entity. Please make sure that Require External ID checkbox is selected.
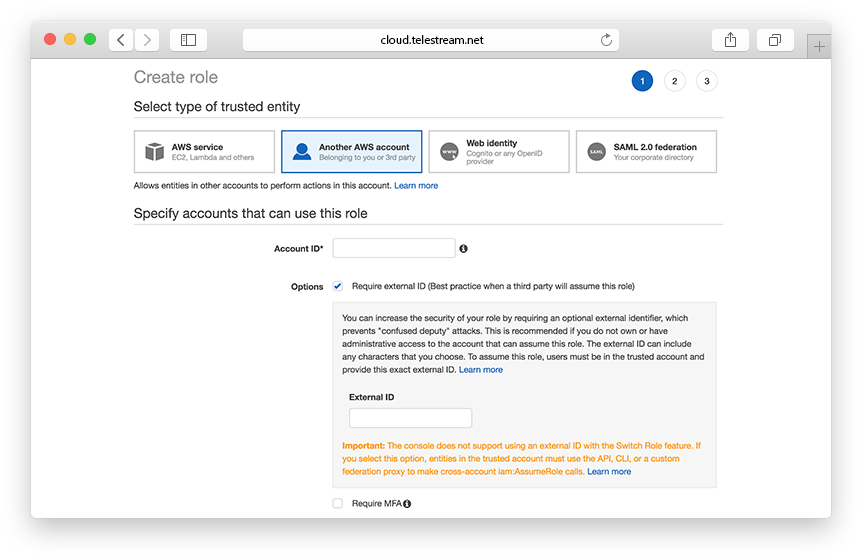
You will need our AWS Account ID and External ID provided in Telestream Cloud console when setting up S3 store to fill these required fields.
Next step is defining permission policies. You can either create a completely new policy or use one of the templates provided by AWS (Amazon S3 Full Access policy provides full access to all buckets). The role must at least have permissions to read and write to a specified bucket. Also, make sure you’re authorised to set the level of permissions assigned to the resource.
Sample S3 Policy
{
 “Version”: “2008-10-17",
 “Id”: “FlipBucketPolicy”,
 “Statement”: [
   {
     “Sid”: “Stmt1344015889221”,
     “Effect”: “Allow”,
     “Principal”: {
       “AWS”: “arn:aws:iam::078992246105:root”
     },
     “Action”: [
       “s3:AbortMultipartUpload”,
       “s3:GetObjectAcl”,
       “s3:DeleteObject”,
       “s3:GetObject”,
       “s3:PutObjectAcl”,
       “s3:ListMultipartUploadParts”,
       “s3:PutObject”
     ],
     “Resource”: “arn:aws:s3:::YOUR-BUCKET/*”
   },
   {
     “Sid”: “Stmt1344015889221",
     “Effect”: “Allow”,
     “Principal”: {
       “AWS”: “arn:aws:iam::078992246105:root”
     },
     “Action”: [
       “s3:GetBucketAcl”,
       “s3:ListBucket”,
       “s3:ListBucketMultipartUploads”,
       “s3:GetBucketLocation”,
       “s3:PutBucketAcl”
     ],
     “Resource”: “arn:aws:s3:::YOUR-BUCKET”
   }
 ]
}
Log in to your account on the Google Cloud Platform
If you use Google services in your company on a daily basis Google Cloud Storage might be your preferred place to store your Telestream Cloud outputs. If you don't have Google account yet but wish to use this vendor for cloud services, you will be prompted to create one at https://cloud.google.com
Create a bucket for using Telestream Cloud
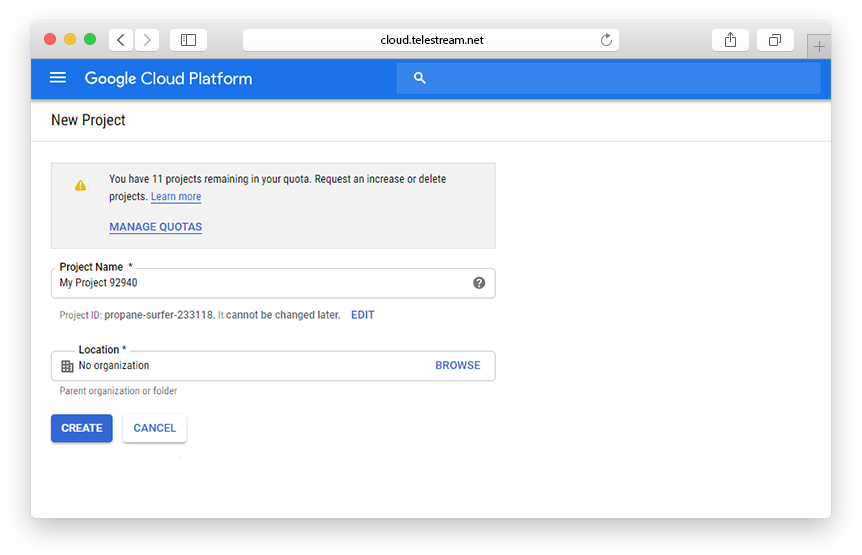
In Google Cloud Store all data (objects) belongs inside a project. Buckets are basic containers inside projects. So first you should create a project. A project consists of a set of users, a set of APIs, and billing, authentication, and monitoring settings for those APIs.
Go to https://console.cloud.google.com/projectcreate, log in and create a project for Telestream Cloud.
Enter the Project Name (Remember that you will not be able to change it later) and Location (parent organization or folder).
Once you've created the project, go to https://console.cloud.google.com/storage/browser to create a bucket for your Telestream Cloud data.
Follow the instructions, step by step:
- Click Create bucket
- Specify a Name - bucket names have more restrictions than object names and must be globally unique, because every bucket resides in a single Cloud Storage namespace.
- Select a Default storage class for the bucket – there are costs associated with this choice, so it is worth considering which one to pick. You can click on Compare storage classes to see monthly cost estimates per storage class.
- Choose Location where the bucket data will be stored.

Click Create and you got it!
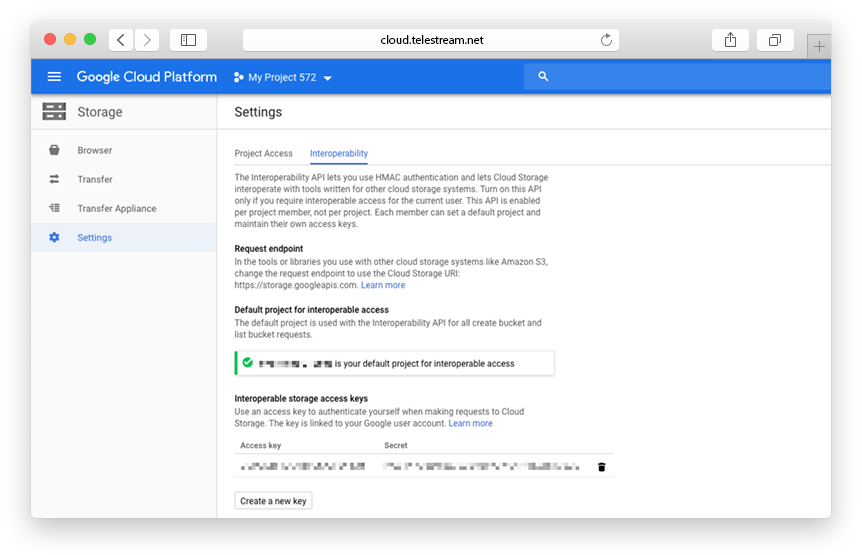
The next step is to add the created store in the TC console. You can do it in two ways. First, by providing Access Key and Secret Key when creating your store in the Telestream Cloud panel. The second way is to use Cloud Identity and Access Management (Cloud IAM) permissions.
Enabling your store for Telestream Cloud using Access Key and Secret Key
In the Google Cloud Platform service, these keys are called "interoperable keys" or "migration keys". To generate Access Key and Secret Key, you should go to your project’s storage page.
In the left sidebar of the dashboard, click Google Cloud Storage and then Settings. Select the Interoperability tab. If you haven't enabled it already, click on Interoperable Access.
Now you should see an empty list and a Create new Key button. Click the button to create an Access/Secret key pair.
Now open your Telestream Cloud console to add your storage.
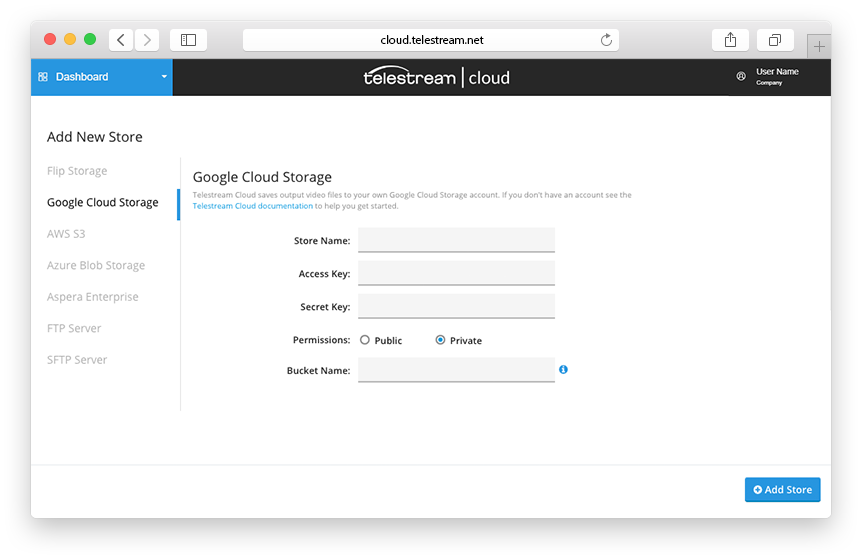
Fill in the appropriate fields, giving the store name and the bucket name, entering Access Key and Secret Key for authentication (Remember that we do not store your credentials and need it only once when creating the role). Click Add Store and you’re done.
If you are an enthusiast and use the software and solutions offered by Microsoft on a daily basis, the best solution is to use Azure Blob storage for Telestream Cloud services.
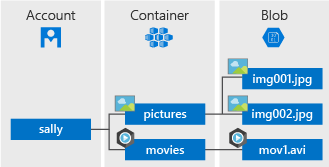
All your data (objects) in Azure Blob is stored as the so-called blobs in the containers. This is the equivalent of buckets that are used in Amazon S3 and Google Cloud Storage.
At the beginning, let's explain the structure of Azure Blob storage. It has three types of resources:
- The storage Account
- A container in the storage account
- A blob
Now you need to create a container for Telestream Cloud. First, you have to create storage account if you don’t have one already.
How to create storage account, step by step:
- If you don't have an Azure subscription, go to https://azure.microsoft.com/free/ to create a free account before you begin.
- In the next step, you need to log in to https://portal.azure.com/
Every storage account must belong to some Azure resource group - a logical container for grouping your Azure services. When you create a storage account, you have the option to either create a new resource group or use an existing one. We’ll show you how to create a new one.
A general-purpose v2 storage account provides access to all of the Azure Storage services: blobs, files, queues, tables, and disks. Go to Azure portal and then:
- Select All services.
- Start typing Storage accounts in the list of resources, and select it.
- The Storage accounts window will appear, choose Add.
- Select the subscription in which to create the storage account.
- Click on Create new under Resource group field.
- Enter a name for your new resources group.

- The next thing is the name for your new storage account. It must be unique across Azure. It can consist of 3 to 24 characters and includes numbers and lowercase letters.
- Select a location for your storage account, or use the default location.
- Leave these fields set to their default values:
| Field | Value |
|---|---|
| Deployment model | Resource Manager |
| Performance | Standard |
| Account kind | StorageV2 (general-purpose v2) |
| Replication | Locally redundant storage (LRS) |
| Access tier | Hot |
- We’re almost done! Select Review + Create.
- If the review was successful, click Create.
Now it’s the time to create a container for Telestream Cloud.
Follow the instruction, step by step:
- In the left menu for the storage account, scroll to the Blob service section, then select Blobs.
- Then click on Container button.
- Enter a name for your new container. You can use numbers, lowercase letters, and dash (-) characters.
- Select the level of public access to the container. The default level is Private (no anonymous access) and we recommend to leave it this way.
- Click OK to create the container.
Your container is ready. Well done!
Enable your Azure Blob storage in Telestream Cloud console
Before you do that you will need to obtain your Storage Access Key.
- Go to Azure portal.
- In the navigation panel, click on All resources.
- Choose the proper storage account.
- Click on the Key icon to view the Access Keys for the storage account. Note that every storage account has two Storage Access Keys.
- Click on the Copy icon next to the first Storage Access Key.
- Open your Telestream Cloud console and paste the copied Storage Access Key.
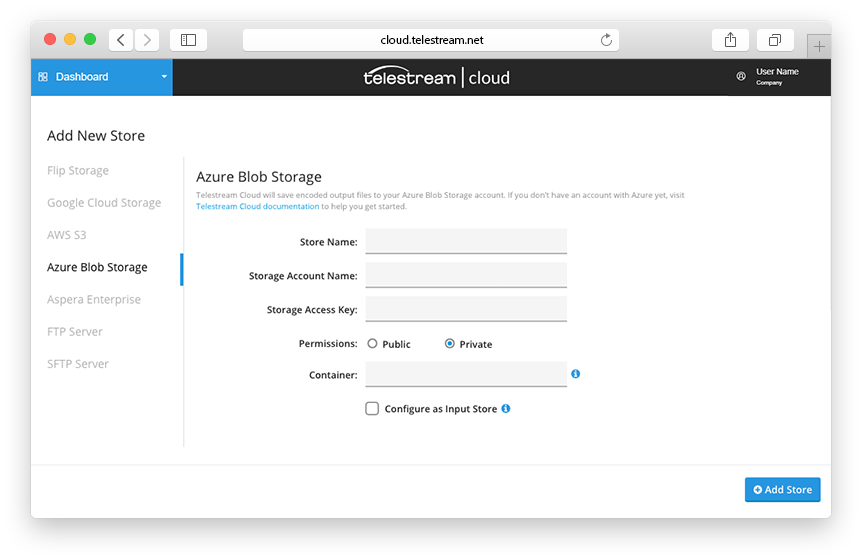
- Fill in the appropriate fields, giving the store name, entering the storage account name and the container name.
- Click Add Store and it’s done.
You’re now ready to use full potential of Telestream Cloud!
Everything in Timed Text Speech service happens within a Project. This is where you define:
- language that will be used for transcription (base transcription model)
- custom vocabulary (optional) that helps to improve results by adding names, acronyms, places, specialized terms, etc.
Transcription jobs are submitted to a Project for processing and once finished the are ready for review and edition if needed.
Setting up a Project is pretty straightforward process, we did our best to make it as easy as possible.
![]()
When creating a project - apart from naming it - you need to pick the transcription output format and base language model. Model contains many words that are used in everyday conversations and would be sufficiently accurate for a variety of general applications. However, it can lack knowledge of specific terms that are associated with particular domains.
![]()
How do you address that? You may optionally add custom vocabulary that is specific to certain domain - law, sports, medicine, technology, and so on. It can be done in two ways. By uploading corpus files or adding words manually.
![]()
A corpus file is plain UTF-8 text file that ideally contains sample sentences with domain specific words used in the context they usually appear in, to improve recognition accuracy. If you already have or plan to create corpus files please make sure each sentence is in a separate line and uses consistent capitalization.
You can also add words manually - again using separate lines for each word or sentence is essential. Custom vocabulary can be added or updated later in the Projects Settings.
If you added custom vocabulary then speech recognition engine needs to be trained on using it properly. This may take some time and until then you won’t be able to submit jobs to the Project.
![]()
Jobs can be submitted to Telestream Cloud Timed Text Speech in a few ways - API, from CaptionMaker, or in this case through web console.
Once logged in select the Project that you’d like to use and you’ll be looking at the Transcription Jobs list. This is where you can keep track of all jobs that have been processed or are currently in progress.
![]()
Click Submit Transcription Job button to select files for processing. You can either drag & drop source files from your local disc or paste the URL. There is a size limit of 100MB on the audio data that you can transcribe at one time. If you upload media file we will extract audio track from the video before the transcription process.
![]()
When ready, submit job to start the upload and then the transcription. You can follow the general progress in the jobs list. You can also dig into details by clicking the job from the list to see more detailed view. When transcription is finished it’s time to move on to the final stage - review and edition.
While Timed Text Speech transcription accuracy is usually very high you may want to review the final result anyway. That’s why we added ability to generate proxy file (either audio or video) that makes this process even easier.
![]()
Media file timeline has markings to show parts of transcription that may need your special attention. This would usually happen if there are couple alternatives with similar confidence levels or if it falls below certain level.
The timeline is aligned with the transcription editor below, so any time you click on it you will be taken to respective moment on the timeline. Text highlighted in yellow, red or orange means that speech-to-text engine couldn’t fully determine correct word. This is where you need to step-in and either confirm it’s the right word or correct it by choosing one of the available options or entering it manually. You can also edit whole lines instead of single words.
There are also formatting options that allow you to split or merge lines to match the media file. All changes are visible on the fly so you have instant feedback of your actions. If at any time you need to review changes there is history view available.
![]()
As soon as you’re happy with the final result you can download the transcription file in one of the available formats - JSON, CSV or SRT and use it in your project.
Using Telestream Cloud for auto-transcription of media files is a great way to get started on a caption or subtitle project.
All submissions will result in an automatically generated transcript with timing to match your media file. The timed transcript can be reviewed and edited on the fly in the Telestream Cloud console or directly populated into your CaptionMaker project. The more accurate the results the less clean up and editing is needed to make you transcript perfect. Below are some best practices and tips that can help increase the accuracy of the auto generated transcript from Timed Text Speech.
Isolating spoken word
For original content or media with multichannel audio, the dialogue only track can be isolated to eliminate noise, music, and sound effects. This isolation can be done with any video editing software or audio production tool. By submitting the spoken word alone to the Timed Text Speech engine, accuracy can greatly increase on the auto generated transcripts.
To do this a video editor can open their project in Adobe Premiere or Avid and silence all audio tracks that do not contain dialogue. Next, they can simply export an audio only file. Timed Text Speech can handle audio files such as .mp3, aiff, and wav.
In some cases a media files such as .mov or .mxf may contain multiple audio tracks. This could be a 5.1 mix or required isolated tracks for archival or transcode purposes. Within CaptionMaker users will have an opportunity to select any of the audio tracks within the video file before submitting their project to Timed Text Speech. By default the software will be submitting track 1 and 2. If there is an isolated audio track in the .mov or .mxf file, the software can be set to submit the alternate audio track instead. This means that the spoken word only track will be processed and results will in turn be more accurate.
Training speech engine via Cloud web console
In many cases, media files that require a transcription may contain names, phrases, and acronyms that are not common. The speech engine may consistently get these wrong causing users to manually correct the results again and again. To remedy this, Telestream Cloud’s console offers a way to train the Timed Text Speech engine by uploading a corpus text file.
This file is a simple plain text .txt document that contains a list of names and phrases that are used in a project. Users can upload this .txt document to any specific project that may require training to increase accuracy. We recommend that the .txt document contain a list of phrases instead of words.
For example an effective corpus text document would look like this:
CEO of the Company
Working with CDN providers
Transcoding and captioning solutions
CaptionMaker Software
An example of a corpus text file that is not effective looks like this:
Galveston
CDN
Providers
Transcoding
Captioning
CaptionMaker
Software
By using phrases the speech engine knows what to expect and what other words are typically used with the new vocabulary. This means that results for custom vocabulary will increase in accuracy.
In some cases, creating a corpus text file for training is very easy and takes very little time. Some users simply repurpose the old transcripts or captions files from the same TV program or Project. For example, if a broadcaster needs to create a transcript for season 3 of a TV program, they can open the caption files from season 1 and 2 using CaptionMaker and export a corpus txt file that can be used for training Timed Text Speech. These 2 previous seasons contain the names and phrases that would greatly increase the vocabulary.
Another way that users can leverage the vocabulary training of Timed Text Speech is when a rough transcript is already available of the media file prior to submission to Telestream Cloud. This rough transcript will also contain the names and key phrases for the project. Timed Text Speech would then automatically time the rough transcript and fill in the text that is missing.
Content type that is best suited for ASR
The type of video content plays an important part in the level of accuracy using auto-transcription software. For example, a news show with a professional announcer and clear studio audio will have great accuracy vs. a video shot outdoors in a noisy environment on a mobile phone. In addition, loud music, singing, and shouting will also bring down the level of accuracy. There are also cases where speakers may change their voice to provide dialogue for children’s programming or for dramatic effect. This means that a speech engine that is designed and trained for standard voices may not be able to understand these voice tones. Generally speaking, project with studio quality recordings and professional speaker will always result in the best accuracy.
Creating a proxy
Professional video companies generally work with high quality video master files called mezzanine files. These files are used the same way tape masters were used in the old days. The original video must be uncompressed or high bitrate when submitted for processing. This is not the case for Timed Text Speech workflows. Because Telestream Cloud requires only the audio file for auto-transcription, users can submit a low bitrate MP4 or just the audio file. As long as the audio quality is good the video quality or resolution is not relevant for speech to text.
Voice over for the purpose of ASR
For video editing workflows, it’s quite common for editors to do a rough voice over when editing prior bringing in voice talent to do the final audio in the studio. This also provides an opportunity for video editors to re-speak any portions of the video project that do not have clear audio. This rough voice over can be then exported from the video editing system and submitted to Timed Text Speech for processing. This means that results will have a greater accuracy than the original audio.
Case Studies
“Vantage made it possible to build these really complicated workflows that otherwise would have been implausible for any other tool that’s on the market. There’s certainly nothing in the cloud that could do all the things that that we did.”
Telestream Vantage Helps Create Virtual Film Festival for SXSW
“Within 12 weeks, we were exceeding our previous content preparation capabilities. It was a roller coaster ride with us learning on our feet. We went from POC to full production in one of the quickest turnarounds that I have ever experienced working at ITV.”
ITV Uses Telestream Cloud Services to Prepare for BritBox UK on Amazon Prime Video Channels.
This cloud-native solution enables media rights holders to enrich, monetize, and deliver high-value content to distribution partners and viewers worldwide.
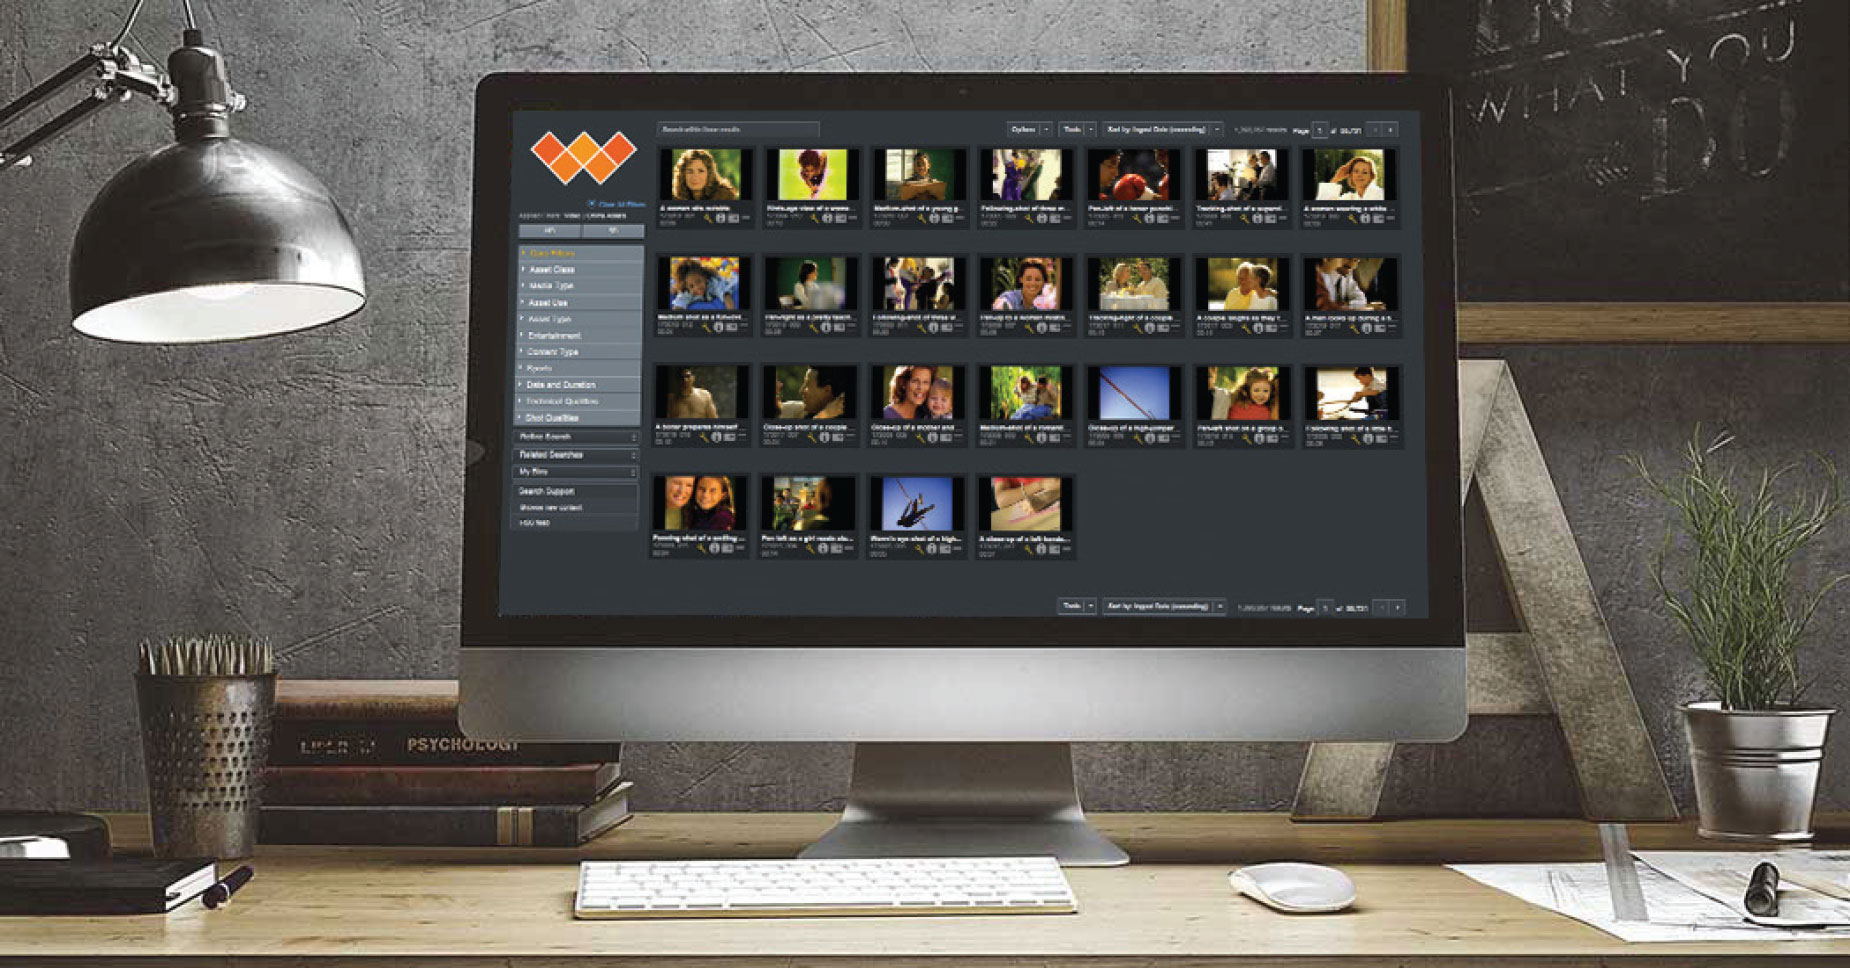
With its cloud asset management service, Wazee Digital has a lofty goal. Its mission is to give content creators and rights holders a way to enrich, monetize, and share their high-value, branded media with the right people, at the right time, anywhere in the world.
Wazee Digital’s client roster is a Who’s Who of the media and entertainment industry, including Steven Spielberg’s production company, Amblin Partners, College Football Playoff, FremantelMedia, USA Swimming, and CBS News.
“We currently handle 750,000 transcodes per month, with daily volumes ranging from 25,000 to 50,000 transcodes. And this workload is growing exponentially. Our business model also requires a global cloud strategy that can intelligently distribute this media processing to the data center that’s closest to the cloud storage or source media for faster transfer and delivery.”
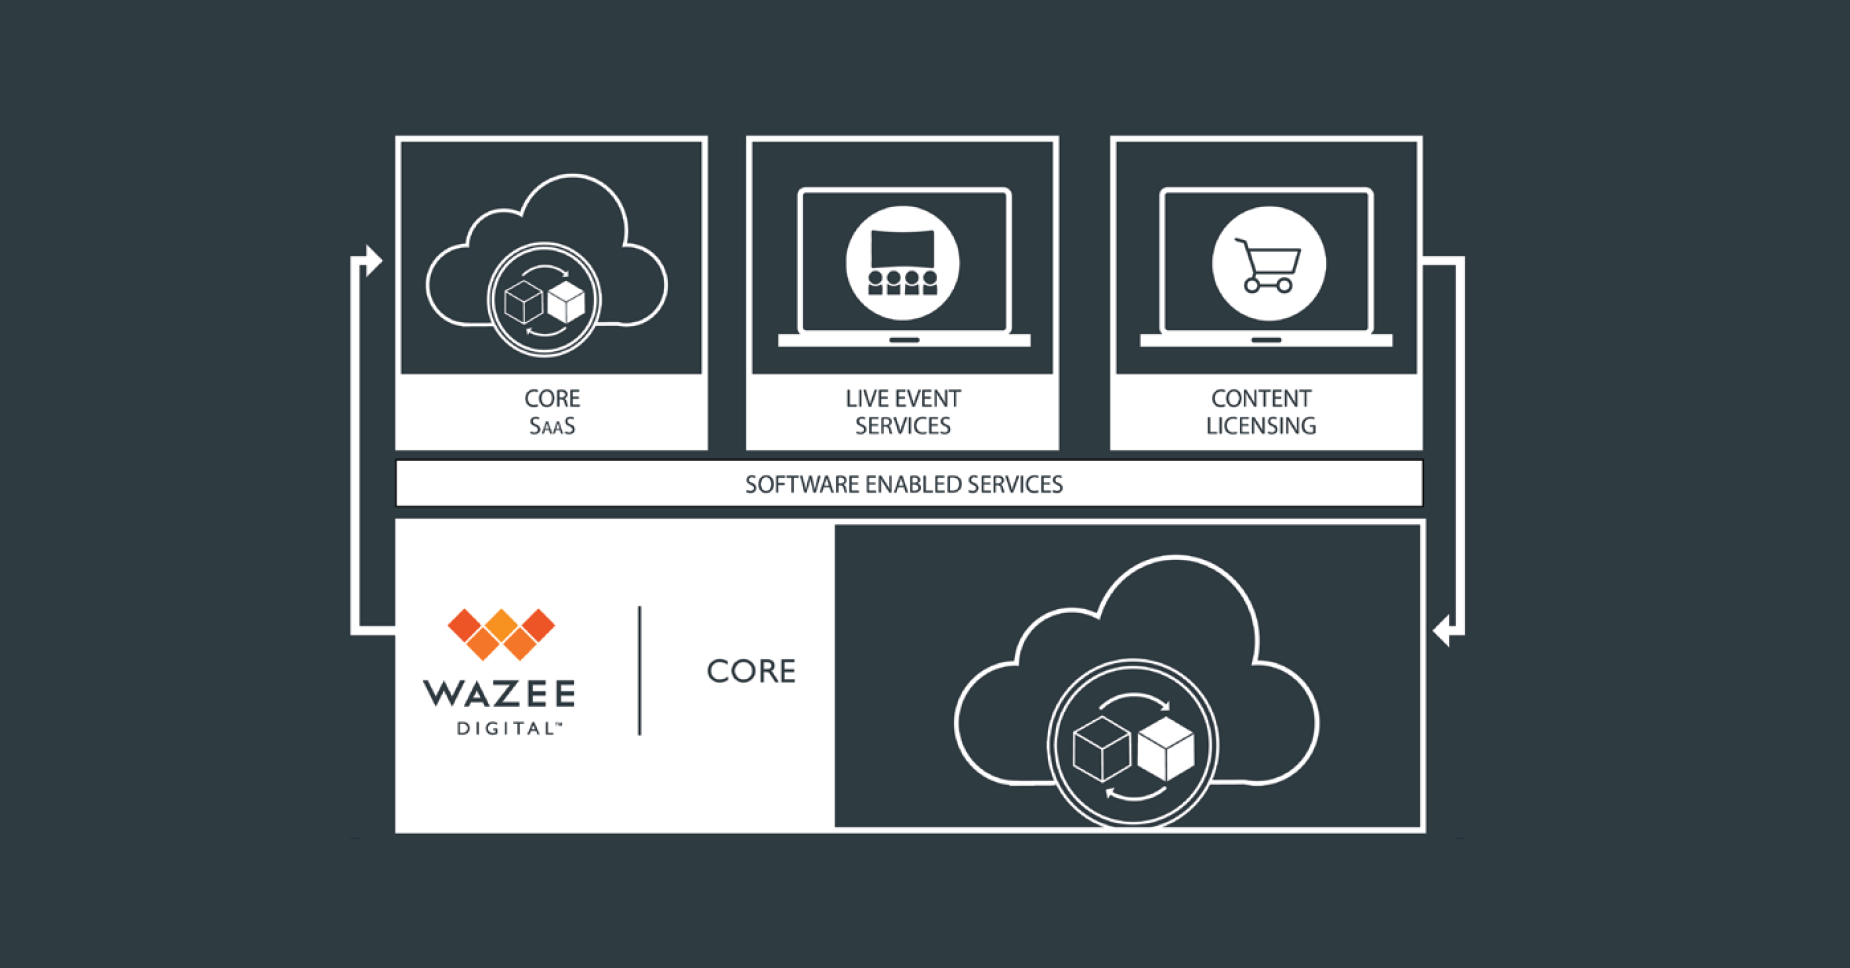
Content creators and media rights holders can select the services they need from the Wazee Digital cloud platform. With its Wazee Digital Core, Commerce and Digital Media Hub solutions, Wazee Digital’s services encompass the following:
- Media asset management providing control, visibility, and insight into assets
- Centralized global access to content
- Organizing media assets in appealing, searchable online galleries and archives
- Content licensing including rights and clearances
- Live event services for real-time capture and metadata enrichment of content
This cloud asset management business model depends upon having an intensive transcoding and media processing workflow capable of transforming rich media files into low-res proxies for browser-based searching and live streaming, as well as the many file formats needed for video-on-demand and multiplatform distribution.
The Challenges
Founded in 2003, Wazee Digital remembers the day when video was shipped on physical media, like hard drives, or delivered via FTP. By 2011, as their workflow became increasingly digital, they began searching for technology vendors that offered comprehensive, end-to-end transcoding solutions.
In particular, they wanted a solution that would automate their high-volume media processing, continually support new codec integration, and provide the responsive tech support required for their time-sensitive services.
The search was over in 2011 when Wazee Digital discovered Telestream Flip Factory, a transcoder that could flip files quickly for greater digital throughput. Over the years, they remained loyal to Telestream, and moved up the product line as greater speed and functionality became available. The timeline of their Telestream product acquisitions is as follows:
- 2011—Flip Factory for transcoding tasks like ProRes upconverting
- 2012—Vantage Media Processing for automating high-volume media processing workflows
- 2012—Lightspeed Servers for accelerated processing and forensic watermarking
- 2015—Vantage Cloud, configured as a hybrid premise/cloud transcoding workflow
- 2017—Telestream Cloud services, powered by Vantage, initially configured as a hybrid premise/cloud workflow
- 2018—Telestream Cloud, with virtually complete migration to an exclusive, end-to-end cloud-native workflow
- 2018—Today, only 5% of their media processing remains at its physical data center in Wyoming, which is slated to close in the first or second quarter of this year
“In our years of working with Telestream, it’s become clear that they are extremely engaged with the market’s requirements, which are constantly changing. That’s something we look for in a technology partner—somebody that listens to customers, gathers market feedback, and then really addresses those concerns in their product development roadmap.
“For us, Telestream was the first vendor that really supported all of the transcoding targets we had in the cloud. There was a race to the cloud and Telestream effectively won that.”
The Solution
By shifting its operation to Telestream Cloud, Wazee Digital saves the time and money associated with running, upgrading, and maintaining their physical data center. Since they now access Telestream Cloud as a usage-based service, they can immediately provision whatever processing power and capabilities they need when they need it, as well as scale back when things are slow to reduce costs.
“With just-in-time cloud provisioning, we’re now free to on-board, enrich, and output media with the quality and turnaround times today’s media market expects. So, while we felt a certain comfort in controlling our own physical data center, we know that we cannot pursue emerging market opportunities and meet our business goals effectively without a holistic solution like Telestream Cloud on the AWS platform.”
While Telestream Cloud can be set up on any major public cloud platform, Wazee Digital chose to use Amazon Web Services (AWS), Amazon’s infrastructure-as-a-service (IaaS) platform. In doing so, Wazee Digital further streamlined its global workflow through localization—the uploading of assets to the AWS data center closest to the customer’s location or cloud storage for faster transfer and processing times.
Content owners can either upload their media files to the cloud storage of their choice or upload it to storage buckets associated with Wazee Digital’s AWS service. When that media is discovered by Wazee Digital’s Core solution, it’s automatically on-boarded for media processing.
The Results
By combining Telestream Cloud with AWS, Wazee Digital is realizing greater operational efficiency. Just in terms of localization, Wazee Digital saves time and money by reducing the instances where large media files—especially HD or 4K resolution—must be transported to a centralized center for processing.
“Not having to move an asset very far for transcoding is advantageous to serving our customer base and opening up new international markets. And it’s especially important to certain rights holders that don’t want their digital properties to leave their home territory or cross international borders.
“With 85 percent of our customers in the U.S., and 15 percent in the UK and Australia, it was beneficial to us that Telestream engineers worked closely with Amazon to build out their Telestream Cloud service to include the AWS data centers we need in the UK and Australia.”
According to Noecker, the way that Telestream makes incremental improvements to its comprehensive cloud platform gives Wazee Digital confidence that this managed cloud infrastructure will keep pace with their demands, and scale sufficiently as they grow.
For example, in late 2016 or early 2017, Telestream engineers solved a key concern for Wazee Digital by enabling the processing of sub-clips of large media assets. With sub-clipping, they could transcode just the portion of the media asset that someone wanted to license or use. Considering their overall transcoding volume, this feature is a big timesaver that boosts productivity.
“To put a sharper point on our Telestream partnership, our Wazee Digital Core cloud asset management service simply isn’t as powerful without a robust, full-featured transcoding platform like Telestream Cloud.
“We must be able to ingest high-bitrate native files, convert them to low-res proxies for browsing and streaming, and quickly spin-up whatever file formats and resolutions are required for an optimal user experience. Telestream Cloud is definitely core to our platform, no pun intended.”
Telestream Cloud Advanced Services offer affordable encoding solution to comply with Verizon’s strict technical requirements
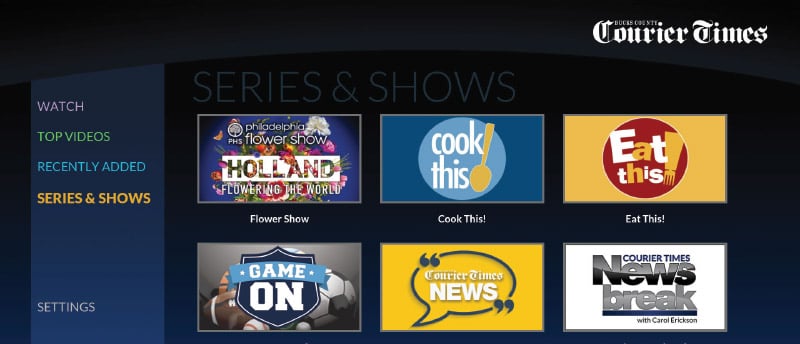
Established in 1937, Calkins Media produces five regional newspaper titles in New Jersey and Pennsylvania. The company also owns ABC affiliate TV channels in Alabama and Florida, to support a combined weekly audience of 3.4 million viewers. From their heritage as community journalists, the content produced by Calkins Media has traditionally been focused on news and consumer affairs. However, a few years ago, the company expanded into production of a number of lifestyle programs and channels. Today, Calkins Media has around 20 such lifestyle programs that are shown on linear TV channels.
In late 2016, Calkins Media was offered a major new business opportunity, when Verizon Media offered to carry some of their popular shows including “Ask The Pet Vet” and “Eat This!” on the Verizon VOD platform.
For Jake Volcsko, Digital Media and Marketing Director at Calkins Media, this presented both business and technical challenges for their digital production platform. The first technical challenge was how to encode content so that it would comply with Verizon’s strict on-boarding requirements.
The second challenge was financial, as Volcsko and his team needed a way to encode content without incurring major capital expenses.
Calkins Media initially turned to Telestream to look for a solution to the technical problem.
“While other vendors were thinking about how to meet Verizon’s specifications, Telestream responded quickly and showed how easy it was to do this on the Vantage platform,” said Volcsko. “Telestream understood our requirement and showed me a solution within days.”
The answer to Calkins Media’s business challenge also came from Telestream, in the shape of the Telestream Cloud Advanced Services. These services allowed Calkins Media to access all the features of the Vantage Media Processing Platform workflows on a “pay-per-minute-created” basis, with transcoding and upload to Verizon being part of a single process.
“The Verizon contract would not have been viable for Calkins Media without the flexible payment model offered by Telestream Cloud, coupled with the technical expertise of the Telestream team,” commented Volcsko.
Volcsko had looked at other Cloud transcoding services but found their billing models were difficult to interpret. “With Telestream Cloud I can know exactly what it will cost, and it is really easy to use,” he concluded.
Literature
- Brochure: Encoding.com
- Cloud Microservice Workflow Design - This Essential Guide from The Broadcast Bridge looks at how modern cloud infrastructures should be built and why. It discusses job queueing, resource scaling, and how microservices provide a whole plethora of broadcast processing that was once only available in hardware.
White Papers
- Media Processing in the Cloud or On-prem - Which Is Right For You? Streaming Media Guide Thought Leadership Article Reprint
- When Creating Comprehensive Media Packages, Video Might Just Be the Easy Part - reprint article published in the 2022 July/August issue of Streaming Media
- Productive Cloud Workflows Essential Guide from the Broadcast Bridge Written for technologists, their managers, and anybody looking to improve their knowledge of cloud-born infrastructures and workflows, the Broadcast Bridge Productive Cloud Workflows Essential Guide shares what it means to operate in the cloud and how the cloud influences broadcast television.
- A Guide to Adaptive Bit Rate (ABR) Encoding Explained Along with How to Use Automation to Increase Efficiency (Updated February 2022)
- Worried about the Last Mile? Don’t Forget the First! how monitoring services can be spun up and positioned where needed to ensure correct content is delivered as intended – reprint article published in the 2021 September Streaming Media Innovation Series Guide.
- Monitoring to the Rescue for Ad Revenue & User Experience - reprint article published in the April/May Streaming Media Innovation Series Guide.
- Cloud Developers Now have Access to World Class Encoding and Transcoding Tools - reprint published in the 2021 June Streaming Media Innovation Series Guide.
Solution Briefs
- Solution Brief: Encoding.com plus Microsoft Azure
- Solution Brief: Beamr CABR Encoding
- Solution Brief: CableLabs-Compliant Output from the Cloud
- Solution Brief: Content Conformance & Assembly in the Cloud
- Solution Brief: Dolby Vision Processing
- Solution Brief: Digital Rights Management
- Solution Brief: Ludicrous Mode - Ultra-Fast Parallel Processing for File-Based VOD Workflows
- Solution Brief: Apple ProRes Workflows
- Solution Brief: Cloud-Based Processing for B2B Video Distribution
- Solution Brief: Closed Captioning in the Cloud
- Solution Brief: Process Complex Audio Workflows in the Cloud
- Solution Brief: Automated Quality Control - Cloud-based validation of your high-value VOD assets
- Solution Brief: AVOD Workflows in the Cloud
- Solution Brief: Dynamic Ad Insertion, Optimize the value of your VOD assets
- Solution Brief: SVOD Workflows in the Cloud
- Solution Brief: Live to VOD with Automated Workflows