
|

|

|

|
|
|
|
|
|
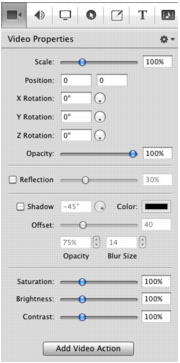
Video properties can be used to make visual changes to any screen recording, camera-based video, other imported video clips, and text image clips ina screencast.You can also apply video properties to video actions you’ve added to a clip. When applying properties to an action, only value-based properties (those that have a numeric value) are transitional – these can be applied to both the start and end of an action to create a transition.For example, you have a 30-second video clip, and you add a video action to the start of the clip, and another video action to the end of the clip – each 4 seconds long. Next, using the scrubber, you set the start of the beginning video action to 0% brightness, and the end of the beginning video action to 100% brightness. Next, you set the beginning of the ending video action to 100% brightness, and the end of the ending video action to 0% brightness, to create a fade-in and a fade-out effect.Select a video, screen recording, or text clip, or select the start or end of a video action in the video or screen recording clip before applying properties.Figure 28. Video PropertiesAdd Video Action. Select to add a video action at the moment indicated by the scrubber in the selected clip.Reset to Defaults. Select to reset all properties in this panel to default values.Scale. Scale is used to change the size of a video or image. This is useful for highlighting a particular portion of the screen or with a video action to create a zoom effect.Position. Position represents the location of your video or image on the canvas. The location is based on the position of the center of your image. Values in the position field are represented in pixels.You can reposition the image by dragging the image on the canvas, nudging the image with the arrow keys, or entering a numerical value in the position fields.X/Y/Z Rotation. Use the rotation options to rotate a two dimensional image in a virtual three dimensional space. Values in the rotation field represent degrees.X Rotation rotates the image along a fixed horizontal axis. Y Rotation rotates the image along a fixed vertical axis. Z Rotation spins the image along a fixed depth axis.Use the thumb wheels to rotate the image in real time or manually enter the values (0 to 360 degrees) in the text fields.Opacity. Opacity is the degree of image translucency. The greater the value, the more opaque the image. If the value is set to zero, the image is invisible.This may be used with a video action to fade an image in or out. It is particularly useful if you would like to periodically display your camera recording.Reflection. Reflection creates a mirror image of the selected clip below the clip itself. Check to implement reflection The greater the value, the more opaque the reflection. If the value is set to zero, the reflection is invisible.Shadow. Check to create a shadow effect behind a still image. If you image uses a transparency, the shadow only reflects the non-transparent part of your image.Angle. Use the thumb wheel to set the angle of the shadow relative to the image in degrees. The default is -45 degrees.Color. Click the color field to select the shadow color from the color picker. Default: black.Offset. Specify the distance between the shadow and the clip, in pixels. Default: 40.Opacity. Opacity is the degree of shadow translucency. The greater the value, the more opaque the shadow. If the value is set to zero, the shadow is invisible. Default: 75%.Blur. Blur is a gradual loss in opacity as the shadow spreads from the center. Default: 4.Saturation. Saturation is the intensity of a color relative to its brightness, represented as a percentage. Default: 100%.Brightness. Brightness is the degree of luminosity present in the image, represented as a percentage. Default: 100%.Contrast. Contrast is the relative intensity of the black and white values in an image. A high contrast has a greater intensity of black and white values. This value is represented as a percentage. Default: 100%.Add Video Action. Click to add a video action at the moment indicated by the scrubber in the selected clip.
|
Telestream, Inc.
www.telestream.net Copyright © 2012 Telestream, Inc. All rights reserved worldwide. February, 2012 | 80997 |