
|

|

|

|
|
|
|
|
|
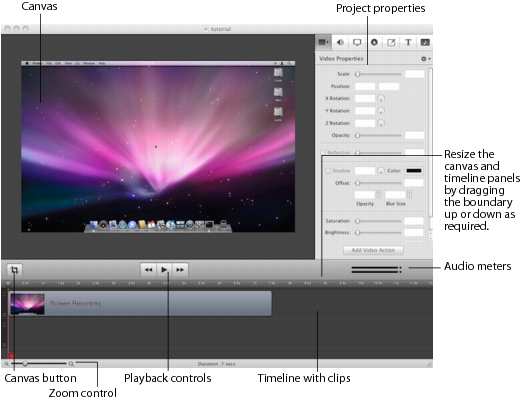
The editing window is the main window for each screencast project you have open. (You can open several ScreenFlow documents and work on multiple projects simultaneously.)Figure 15. Editing WindowYou can resize the canvas and timeline panels as necessary, by clicking and dragging the boundary up or down. The panel boundary is the upper border of the timeline labels, as shown in the figure above.The upper-left panel of the editing window is the canvas. The canvas displays a preview of all content in your screencast, based on the position of the scrubber in the project.You can adjust the canvas size (and resulting frame size of your exported video) and background color using the Canvas button.Canvas Button. Just below the canvas on the far left is the canvas button, which you click to view and adjust canvas properties.Playback Controls. Below the canvas and centered, are playback controls to play your screencast as well as jump to the beginning or end of your screencast.Audio Meters. To the right of the playback controls are the audio meters. The top meter represents the left channel; the bottom represents the right channel.The bottom panel (directly below the player controls is the timeline – a visual representation of the temporal length of your screencast. The scale at the top displays the time scale for this project.The timeline is divided vertically into tracks to manage different clips which may overlap at the same time.The red vertical line on the timeline is the scrubber. The scrubber identifies the current position of the view displayed on the canvas. You can scrub through your project by using the mouse to grab the top handle (in the time scale) and moving it right or left. Notice that as you use the scrubber to scrub your project, the canvas update the video in real time.All of the media in the timeline is referenced to your project’s media library. Changes made in the timeline or on the canvas do not alter your original recording.The upper-right panel displays the properties panel. The properties panel organizes the properties by tab: video, audio, screen recording, callouts, annotations, text and media files – the media library which stores all recorded and imported media in its original format and state.
|
Telestream, Inc.
www.telestream.net Copyright © 2012 Telestream, Inc. All rights reserved worldwide. February, 2012 | 80997 |