
|

|

|

|
|
|
|
|
|
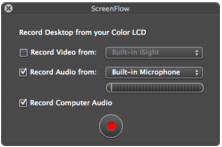
Figure 11. Configure Recording WindowRecord Desktop from. Check this option to record your computer monitor. This source records by default and cannot be deselected. If you have multiple displays connected, you can choose between them. ScreenFlow cannot record multiple monitors simultaneously.Desktop video and audio is combined into a single clip, and added to your project as a ScreenFlow file.Record Video from. Check this option to record video from any camera connected to your computer. Use the dropdown menu to choose from multiple cameras. Upon selecting a source, a preview image is displayed below.Record Audio from. Check this option to record audio from any microphone connected to your computer. Use the dropdown menu to choose from multiple microphones. Upon selecting the source, the volume level is displayed below.Desktop video and audio is combined into a single clip, and added to your project as a QuickTime movie file.Record Computer Audio. Choose this option to record all sounds played through your computer. The ScreenFlow audio driver must be installed to use this setting. If the driver is not installed, you are prompted to install it (see Installing Telestream Audio).Record. Click the red button - the Record icon – to display the countdown window and begin recording.When you have finished recording, video and audio sources are combined to maintain video/audio sync. Desktop video is combined with computer audio and camera video is combined with microphone audio. You can separate these clips using the Edit > Detach Audio command.
|
Telestream, Inc.
www.telestream.net Copyright © 2012 Telestream, Inc. All rights reserved worldwide. February, 2012 | 80997 |