
|

|

|

|
|
|
|
|
|
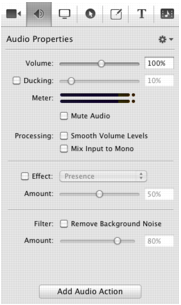
Display the Audio properties tab to modify the selected audio clips in your timeline. You can apply audio properties to any clip which contains audio, including clips with both video and audio.You can also apply audio properties to audio actions you’ve added to a clip. When applying properties to an action within a clip, only value-based properties (those that have a numeric value) are transitional – these can be applied to both the start and end of an action to create a transition.For example, you have a 30-second video clip, and you add a video action to the start of the clip, and another video action to the end of the clip – each 4 seconds long. Next, using the scrubber, you set the start of the beginning video action to 0% brightness, and the end of the beginning video action to 100% brightness. Next, you set the beginning of the ending video action to 100% brightness, and the end of the ending video action to 0% brightness, to create a fade-in and a fade-out effect.Select a video, screen recording, or text clip, or select the start or end of a video action in the video or screen recording clip before applying properties.Figure 29. Audio PropertiesAny clip which uses audio content displays with a waveform. This waveform adjusts to reflect any volume changes.The following image depicts an audio clip with an audio action set to increase volume. Notice how the waveform display is enlarged to the right, due to the action.Figure 30. Audio Clip in TimelineAdd Audio Action. Select to add an audio action at the moment indicated by the scrubber in the selected clip.Reset to Defaults. Select to reset all properties in this panel to default values.Volume. Use the slider or enter a percentage value to change the audio on a clip. This can be used with an action to gradually change the audio level as shown in the image above.Ducking. Check to apply audio ducking and automatically adjust volume levels on overlapping audio clips. When applied to a clip, all overlapping audio is muted to draw attention to the audio in this clip.Use the slider or manually enter the value to specify the percent of reduction to apply. This is particularly useful when using background music with narration.Meter: Depicts relative volume of each channel in the selected clip.Mute Audio. Check to mute the selected audio clip.Smooth Volume Levels. Select this option to normalize and smooth out volume peaks while increasing quieter clips so that the audio has a more consistent volume.Mix Input to Mono. Check to mix multichannel audio into a single mono channel.Effect. Check to apply the selected audio effect (from the dropdown menu) to the audio clip. Use the slider or manually enter the percent of effect to apply.Filter: Remove Background Noise. Check to reduce the audio volume of incidental background noise, which typically results in a clearer audio track. Use the slider or manually enter the percent of sensitivity to apply.Add Audio Action Button. Click to add an audio action at the moment indicated by the scrubber in the selected clip.
|
Telestream, Inc.
www.telestream.net Copyright © 2012 Telestream, Inc. All rights reserved worldwide. February, 2012 | 80997 |
