
|

|

|

|
|
|
|
|
|
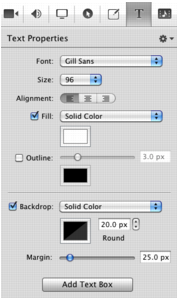
Use Text Properties to create text clips which display blocks of text on your screencast. Text clips behave like image clips on the canvas. You can apply video properties and transitions to text clips.Figure 34. Text Box on CanvasClick the Add Text Box button to add a text clip to your timeline at the moment of the scrubber. Text clips are placed in the top track of your timeline, with a duration of five seconds and the word Text in the box. If there is no room in the top track for this clip (that is, the scrubber is in a clip on the top track), an empty track is added to the top of your timeline, and the text clip is placed in the new, empty track.Figure 35. Text Clip on TimelineClick the text box to change the text in the text box. The name of the clip is changed in the timeline to reflect this content.Figure 36. Text propertiesAdd Text Clip. Select to add a text clip at the moment indicated by the scrubber.Reset to Defaults. Select to reset all properties in this panel to default values. When you select Reset to Defaults, the settings applied by this command are the settings in place when Make Settings Default for New Text Clips was executed.Make Settings Default for New Text Clips. Select to set all properties in this panel to default values for future text clips.Font. Select this menu to choose a font face from the list of fonts provided by your system. The font is applied to the entire text box (if none or all text is selected) or a range of selected characters.Size. Select this menu to choose the size of your text in pixels (range: 9 to 288). The size is applied to the entire text box (if none or all text is selected) or a range of selected characters.Alignment. Select paragraph alignment: Align Left | Align Right | Center. This property affects the selected paragraph, if more than one.Fill. Check to choose Solid Color | Image | Gradient from the dropdown menu. For fill, select a color from the color wheel. The color is applied to the entire text box (if none or all text is selected) or a range of selected characters.For Image, ScreenFlow displays an Open dialog, so you can navigate to and select any custom image file. Deselect the checkbox to remove the file. This can be used with Outline to create characters which are transparent. Applying an image uses the color patterns represented in the image to fill the text.These properties are applied to the entire text box (if none or all text is selected) or a range of selected characters.Color. The color field below allows you to choose the color used in your text. For gradient, click in the top half and select a color, then click in the bottom half and select the second color.Outline. Check to outline the text.The outline is applied to the entire text box (if none or all text is selected) or a range of selected characters.Color. Click to select the color of the outline. Select the color, brightness, and opacity.Backdrop. Check to add a background and choose Solid Color | Image Fill.Color. For Solid Color only, click to select the color of the backdrop. Specify the color, brightness, and opacity.Round. Use the arrows or manually specify the value in pixels to smooth the edge of the text box (range: 0 to 100). Default: 20.Image. For Image Fill only, click Choose display an Open dialog and select an image to insert into the background. Use the dropdown menu below to choose how the image fills the background space: Scale To Fit | Scale To Fill | Tile | Original Size | Stretch.Margin. Use the slider or manually enter the size (in pixels) of the margin (range: 0 to 300). Default: 25.
|
Telestream, Inc.
www.telestream.net Copyright © 2012 Telestream, Inc. All rights reserved worldwide. February, 2012 | 80997 |
