When you are done configuring your export options, click Export to begin encoding the screencast into a video file. ScreenFlow displays a progress dialog so you can monitor its progress.
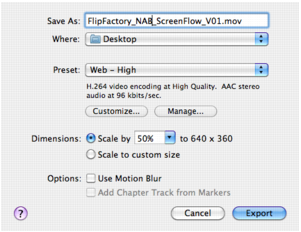
Save As. Enter the name of your screencast. The default name is your project name. The file extension is applied automatically based on your choice of preset.
Where. Select to determine the location of your video upon completion of export.
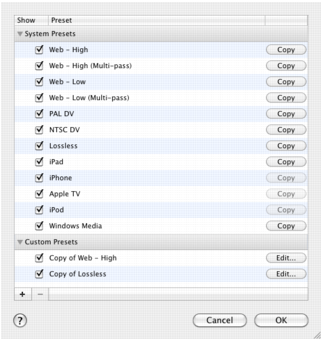
Preset. Export presets are settings designed for both general and specific use. These settings are designed based on the most common needs of the user.
This is an export option similar to Web - High, but formatted for a low bandwidth. It plays more smoothly on slow Internet connections but the image quality is not as good as Web - High.
This option exports video in the WMV format, a popular Microsoft format for Windows users. This option utilizes Flip4Mac, a QuickTime plugin by Telestream (
Flip4Mac Customization) to encode the media, which must be licensed separately.
This is an uncompressed export format ideal for additional editing. This format has the highest quality image but also the largest file size. When exported at 100%, the image quality is identical to the original recording.
Make Settings Default. Select to set your current setting as the default export setting.
Customize. Click to make changes to your video and audio encoding options. You can use either QuickTime or Windows Media video compression (via Flip4Mac).
Manage. Click to manage your available export presets.
Dimensions. These options are used to set the dimensions of your video export. You should not set a size larger that your canvas size. This does not improve image quality.
Scale by. Select to scale your project by a percentage value. This is an easy way to shrink your screencast while maintaining the aspect ratio.
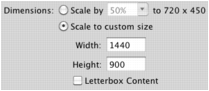
Scale to custom size. Select to set the exact width and height of your exported video. Click the Letterbox Content box to add letterboxing to your export.
Use Motion Blur. Check to apply a blurring algorithm to blend movement smoothly into the video. This is useful if you are using video properties effects to move clips on the canvas.
Add Chapter Track from Markers. Check to add chapter markers to your exported video based on the location and names of the markers in your screencast.
The frame size of video clips in you screencast is typically much larger than the screen size of the video file you are exporting. For example, if your original screen size is 1280 x 800 pixels, you probably do not want to create a video of the same frame size. This is essentially HD video, and may be four times larger than a 640 x 400 video. If you were to post it on a Web site, many users wouldn’t be able to view it.
The NTSC video standard frame rate is 30 FPS. This is the standard for videos produced in North America. However, this standard is based on creating a smooth representation of video motion captured in the real world and may not be necessary for your screencast.
If you specify 30 frames per second, the output will be smooth, but the file will be about twice as a 15 FPS video file. You may find that a 10 FPS or 15 FPS recording is very acceptable for your audience. Reducing the frame rate can drastically reduce the size of the video file.


