
|

|

|

|
|
|
|
|
|
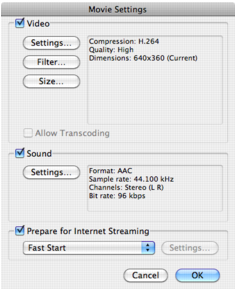
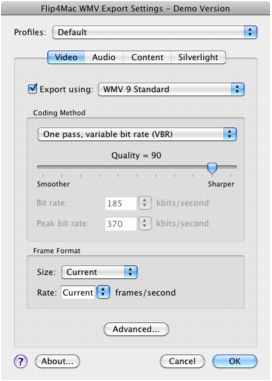
After selecting a preset, click the Customize button to modify these codec settings. ScreenFlow displays the QuickTime compression settings dialog, the standard dialog for all programs which use QuickTime to compress video.If you are customizing the Windows Media preset, ScreenFlow displays the Flip4Mac compression settings window.When you are editing QuickTime-based presets, ScreenFlow displays the standard QuickTime compression settings dialog.Figure 41. QuickTime Compression WindowVideo. Uncheck when you do not want your exported file to contain video content. When unchecked, the file will only contain audio content.Settings. Click to change the video codec and its settings. Each codec has its own set of options controlling frame rate, bit rate, quality, etc.Filter. Check to add effects such as Sharpen, Sepia, Gamma (Adjust) and others. Using filters increases the time it takes for ScreenFlow to render the video file.Size. Check to specify the frame size directly in the codec.Although you can configure the size directly in the codec, Telestream recommends that you retain the default setting (Current). Instead, specify the frame size during the Export process to modify the resulting file size.Sound. Uncheck when you do not want your exported video file to contain audio content. When unchecked, the file will only contain video content.Settings. Click to change the audio codec and its various settings. Each codec has its own set of options, controlling frame rate, bit rate, quality, etc.Prepare for Internet Streaming. Check to export your movie for use on the Internet:Fast Start Allows your movie to begin playing before the movie has finished downloading. This is the default option.Fast Start—Compressed Header Same as the Fast Start option, but compresses the header of the file.Some older versions of QuickTime do not support this option. Therefore, some users may not be able to view video compressed using this format.Hinted Streaming Use when this video will be hosted on a QuickTime Streaming Server (QTSS). This option adds hint tracks, which allow QTSS to stream the movie.To export your screencast in Windows Media format, ScreenFlow uses Flip4Mac WMV Components for QuickTime. This plugin must be installed and licensed separately for full functionality. If Flip4Mac is not licensed, it functions in demo mode to provide a sample of its capabilities.To export a full length Windows Media file, Flip4Mac requires a Flip4Mac WMV Studio license. Customization beyond the preset profiles requires a Flip4Mac WMV Studio Pro license.Figure 42. Flip4Mac Compression WindowProfiles. Select from a list of preset encoding options for Windows Media.Video. Display the video tab to customize the video content in your export.Export Using. Choose between WMV 9 Standard or Advanced (VC-1)Coding Method. Choose between one-pass or two-pass encoding and constant bit rate or variable bit rate. Two-pass encoding requires Flip4Mac WMV Studio Pro HD.Quality. Move the slider to set the quality value of the encoded video as it relates to smoothness versus sharpness.Bit Rate. Set to determine the average bit rate of your video. This applies a baseline for the amount of data to be processed per second while playing your video. A high bit rate allows more complex information which may increase quality while a low bit rate limits the amount of data, which reduces file size and plays more smoothly on a low bandwidth selection.Peak bit rate Set to determine the maximum bit rate when using the VBR Constrained option.Size. Set to determine the resolution of your encoding. Available frame sizes are dependent on your Flip4Mac license.Although you can configure the size directly in the codec, Telestream recommends that you retain the default setting (Current). Instead, specify the size using the Dimensions control in the Export window to modify the resulting size of the movie.If you set a frame size which is not supported by your Flip4Mac license, the plugin defaults to the closest available frame size.Rate. Choose to select the frame rate of your video. Frame rate standards are 30 (NTSC) and 25 (PAL), however for screencasts, you may be able to use an exceptionally low frame rate without noticing a loss of quality.Advanced. This section features advanced encoding techniques including complexity, profile, key frame distance, B-frame distance, buffer delay, and interlacing options.Audio. Display the audio tab to customize the audio content in your export.Export Using. Choose between WMV 9 Standard, Professional, or LosslessCoding Method. Choose between one-pass or two-pass encoding, constant bit rate or variable bit rate, mono or stereo, and various sample rates.Advanced. Set buffer delay.Content. This tab is used to set the metadata on your Windows Media file including title, author, description, copyright, and rating.Silverlight. This tab is for encoding your Windows Media file for use with Microsoft’s Silverlight Player. Here you may select from various player skins to customize your video presentation.
|
Telestream, Inc.
www.telestream.net Copyright © 2012 Telestream, Inc. All rights reserved worldwide. February, 2012 | 80997 |